When managing field service operations, understanding job profit and costs is crucial. With FieldBin Field Service Management, administrators can track job profitability efficiently by analyzing the overall profit of a job based on the invoice amount and job costs, including time and material expenses. In the following example you can learn a basic workflow:
Example Workflow: Plumbing Repair Job for John Smith’s Building
- 4 Day Job
- Assigned to 2 Technicians (Technician #1 is paid at $30/hr, Technician #2 is paid at $20/hr)
- A Home Depot stop is necessary to purchase materials
- Record the purchase on the job
- Add the material expense to the job
- Create Invoice
- See overall profit/cost of the job to include: Time Expense, Material Expense, Invoice
Here’s a detailed workflow example to illustrate how this is done.
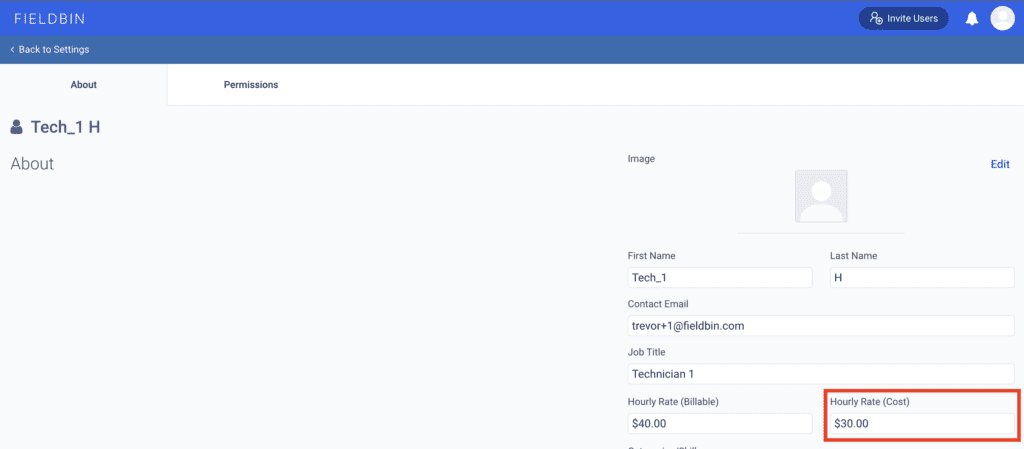
To get started, when we add our technicians to FieldBin, we can set their hourly rate. There are 2 fields: Hourly Rate (Billable) and Hourly Rate (Cost). For this workflow, we will want to be sure the Hourly Rate (Cost) field is filled in with what we pay our technician. Note: Each technician can be assigned a different hourly rate, which makes tracking time expense per job super simple.
Step 1: Job Assignment and Time Tracking
We have created a new job “John Smith’s Building Plumbing Repair” which will be completed over a 4-day period.
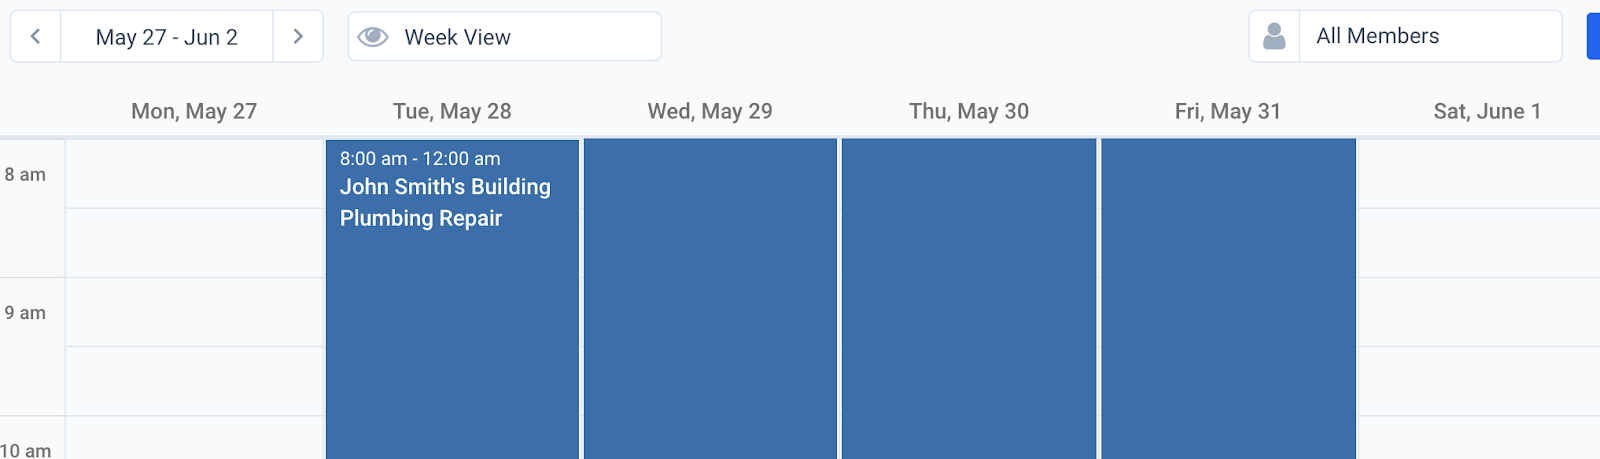
We assigned the job to two of our technicians, Tech_1_H and Tech_2_H.
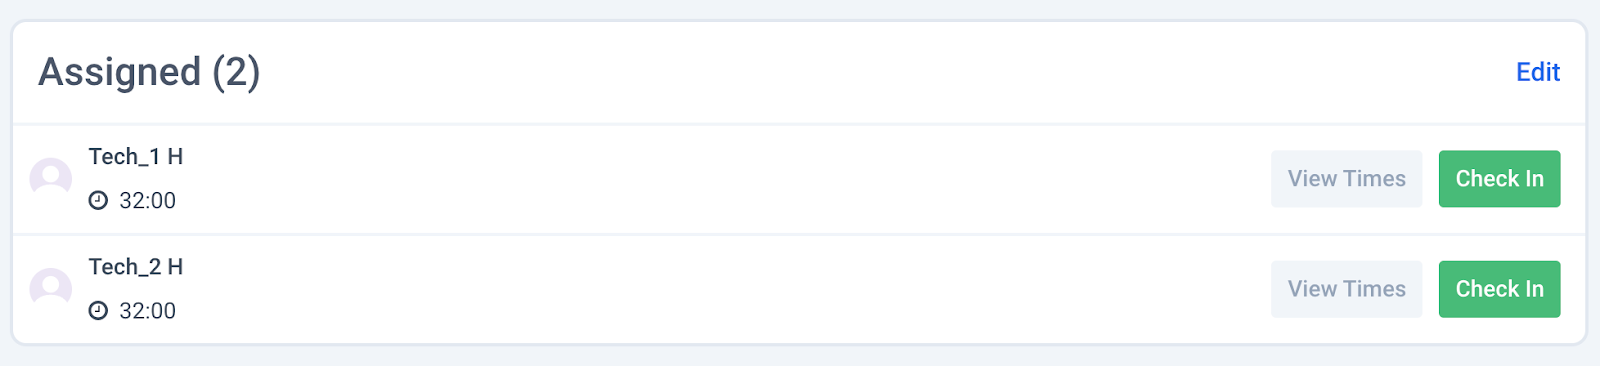
FieldBin is accessible through a mobile web-browser, or available for download on iOS and Android. Using their mobile phones, the technicians can pull up the job for any pertinent details. The will also use FieldBin’s Time Tracking to check in and check out from the job. In this scenario, we will see that each technician worked a total of 32 hours each (recorded over 4 days).
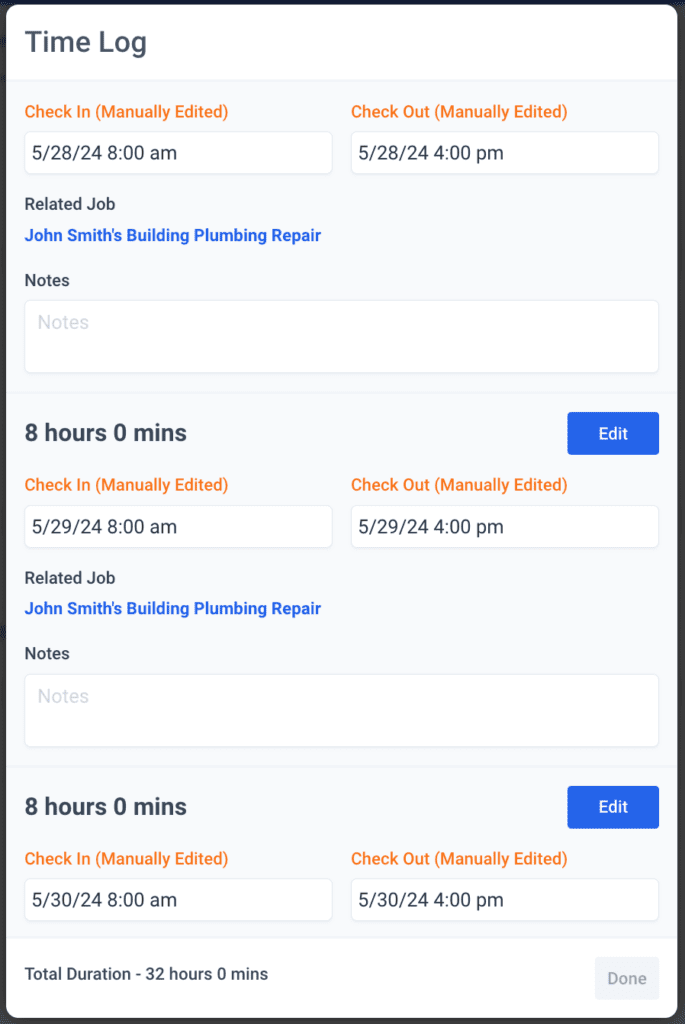
Administrators, at any time, can pull up the time log to see the details of the hours, including if the technicians manually edited the time.
What is a manual edit? When regularly checking in and out of a job, a technician simply clicks “Check In” and “Check Out”. Fieldbin takes a geo-location time stamp with the time and location the action is done. If a technician attempts to manually edit their hours, the system flags it for administrative review. This helps ensure your technicians are working the hours they say they are working.
Step 2: Recording Material Expenses
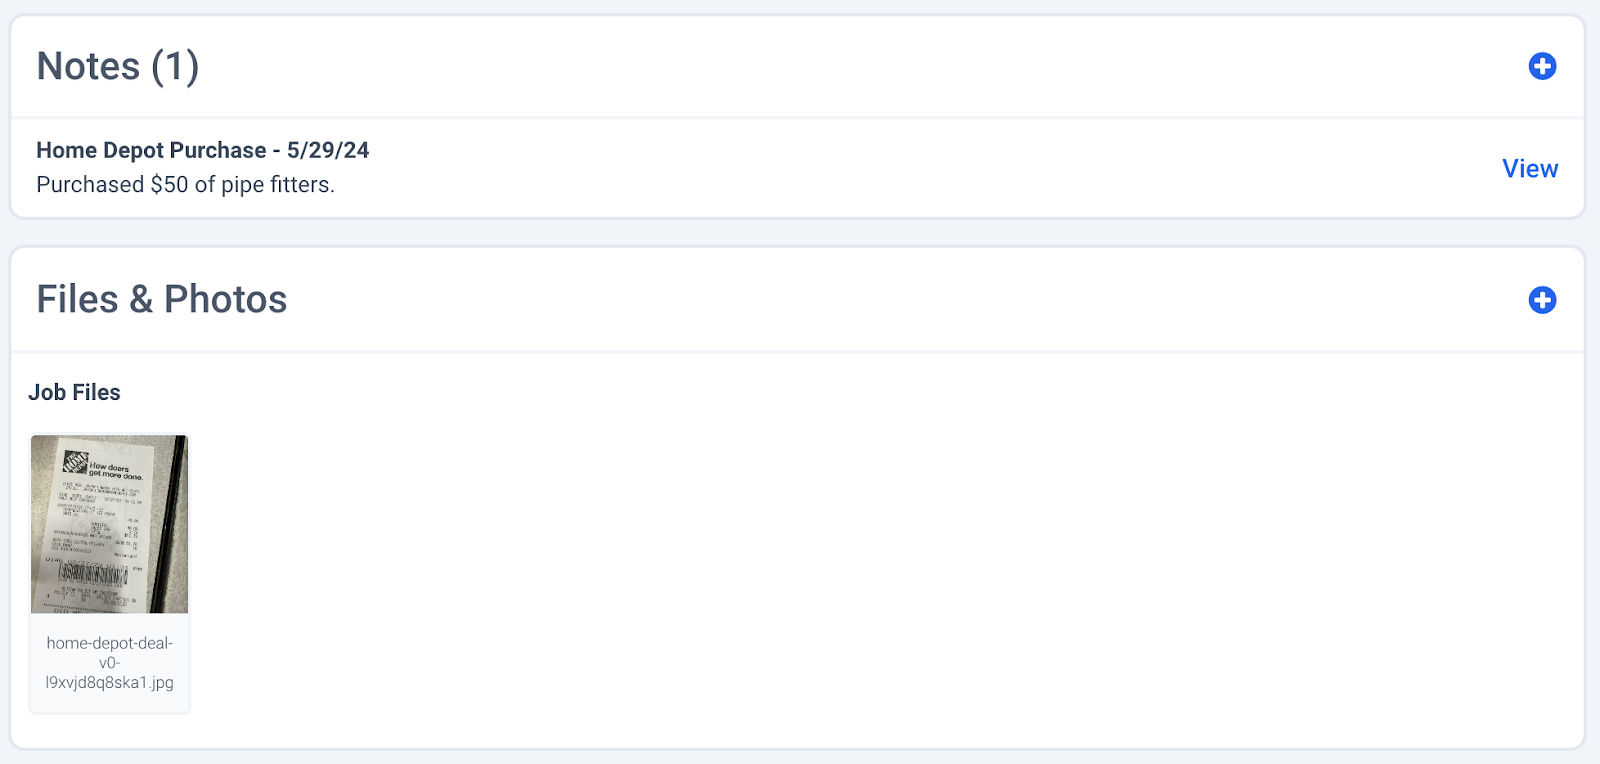
While on the job, the technicians needed to stop at Home Depot and purchase $50 worth of pipe fittings. The business owner will want the receipt and a record to track this expense. The technicians can then navigate the job in Fieldbin and make a note of this purchase. You can see below the purchase has been added as a note and a picture of the receipt has been uploaded for reference.
Adding Materials Used to the Job Profile
This part can either be done on the job, or by a office administrator processing the job.
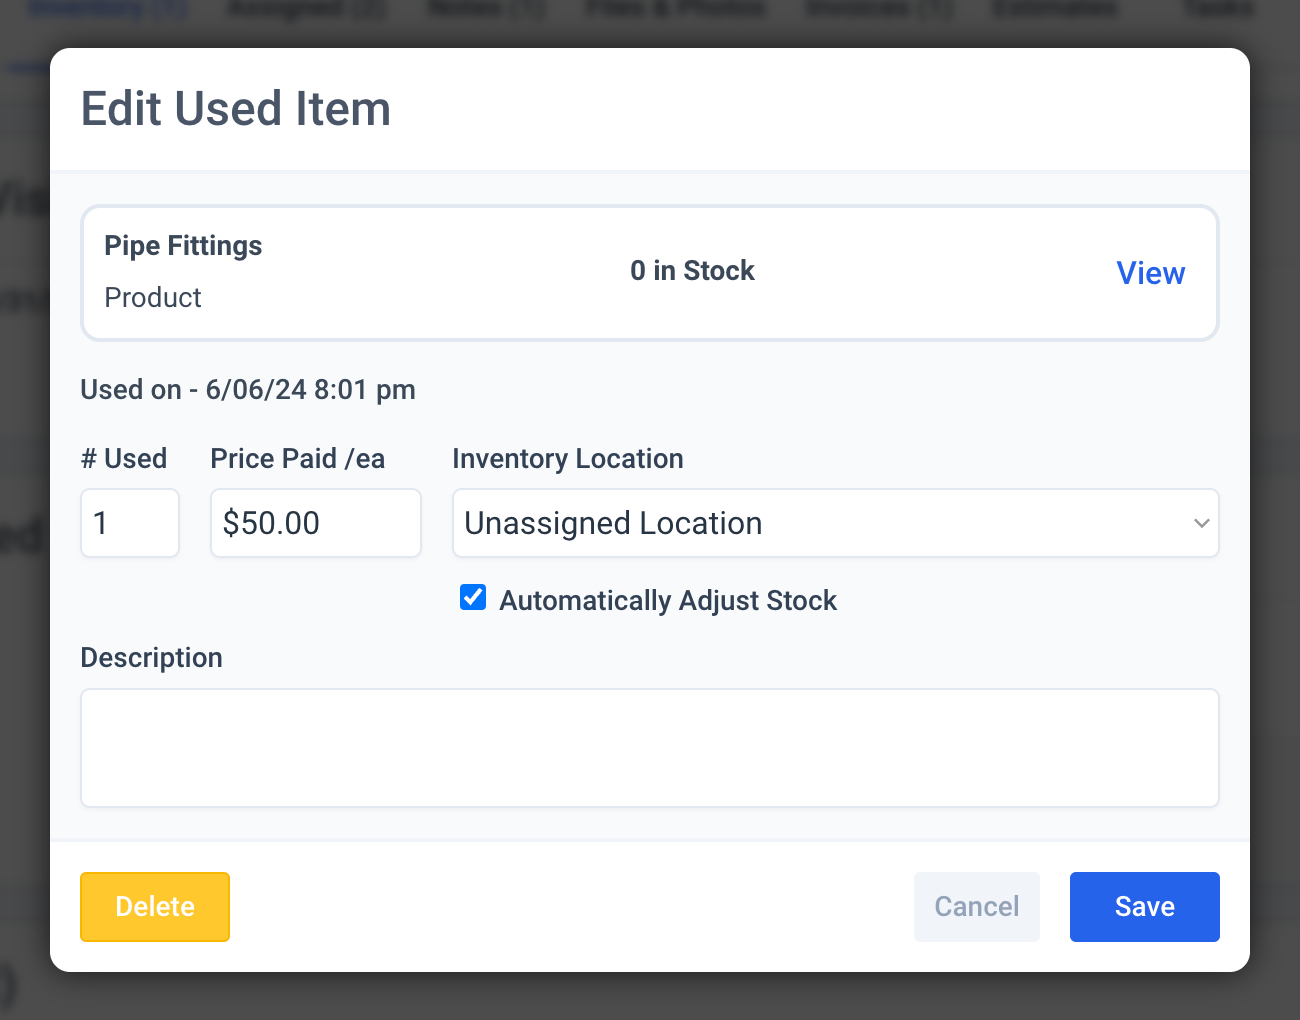
Within the Job Profile, you will see Items Needed and Items Used. In this case, we added Pipe Fittings to job.
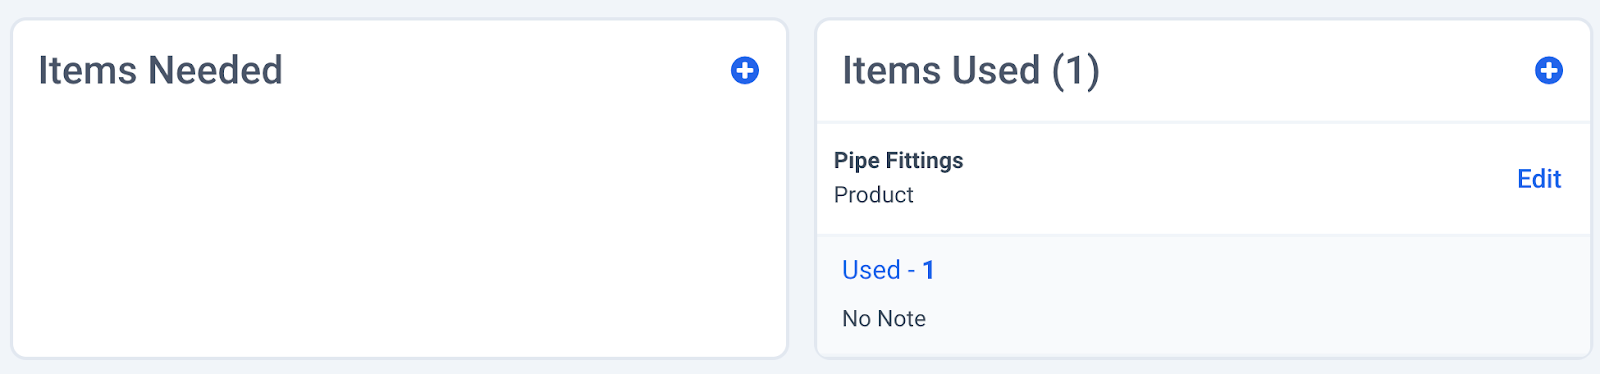
We hit the “+” and added the Pipe Fittings purchase to our inventory. We marked it as “1” in inventory, then when we added it to the job, the inventory was automatically adjusted to track to usage of it. By adding materials under Items Used, we can track Material Expense in our Reports.
Pro tip: Use FieldBin Inventory Management and you can easily add “Items Needed” prior to dispatching a job. When it comes time to marking “Items Used” you can easily click to copy which items were used and automatically adjust your inventory stock levels.
Step 3: Creating the Invoice
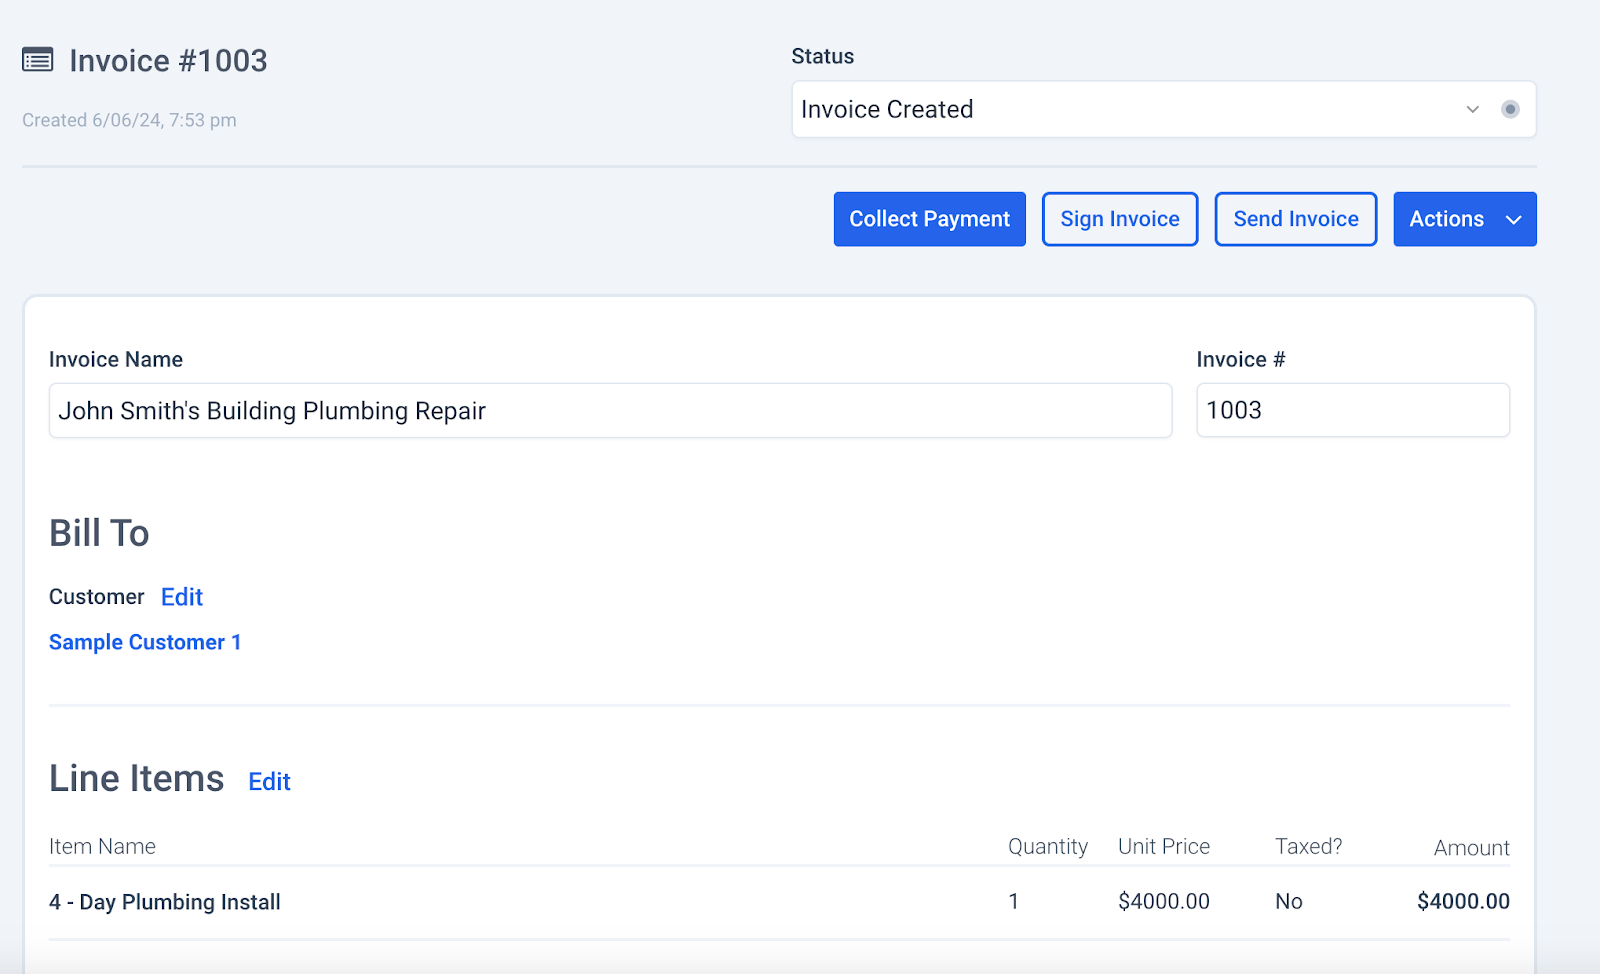
We can then create an invoice. For this workflow, the business owner submits bids prior to completing the job, so there’s a flat invoice amount of $4000. Note: In the rare case you need to add additional line items to your invoice, FieldBin’s Invoicing Feature is flexible and it can accomplished with ease.
Pro tip: When creating an invoice, FieldBin provides a couple different options to make it easy for you. If you are using FieldBin Estimates, you can copy the details of the estimate over to the invoice in a single click, and make any necessary adjustments from there. Alternatively, FieldBin will automatically review the Job Profile for Time Expense and Items Used providing you a call-to-action to review and/or add those items directly to the invoice.
The invoice is ready to go! You can sign off on the invoice, then send to the customer via Email or SMS Text. Payment can be marked as an offline-payment collected; or, if you’re integrated with Stripe, you can collect payment over the web via a payment link.
Step 4: Viewing Reports and Profit Calculation
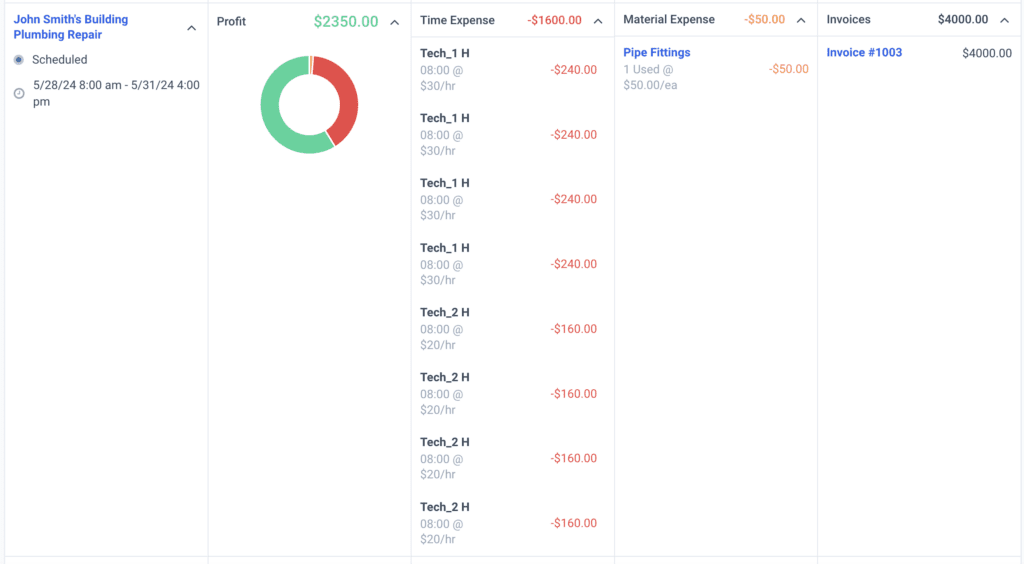
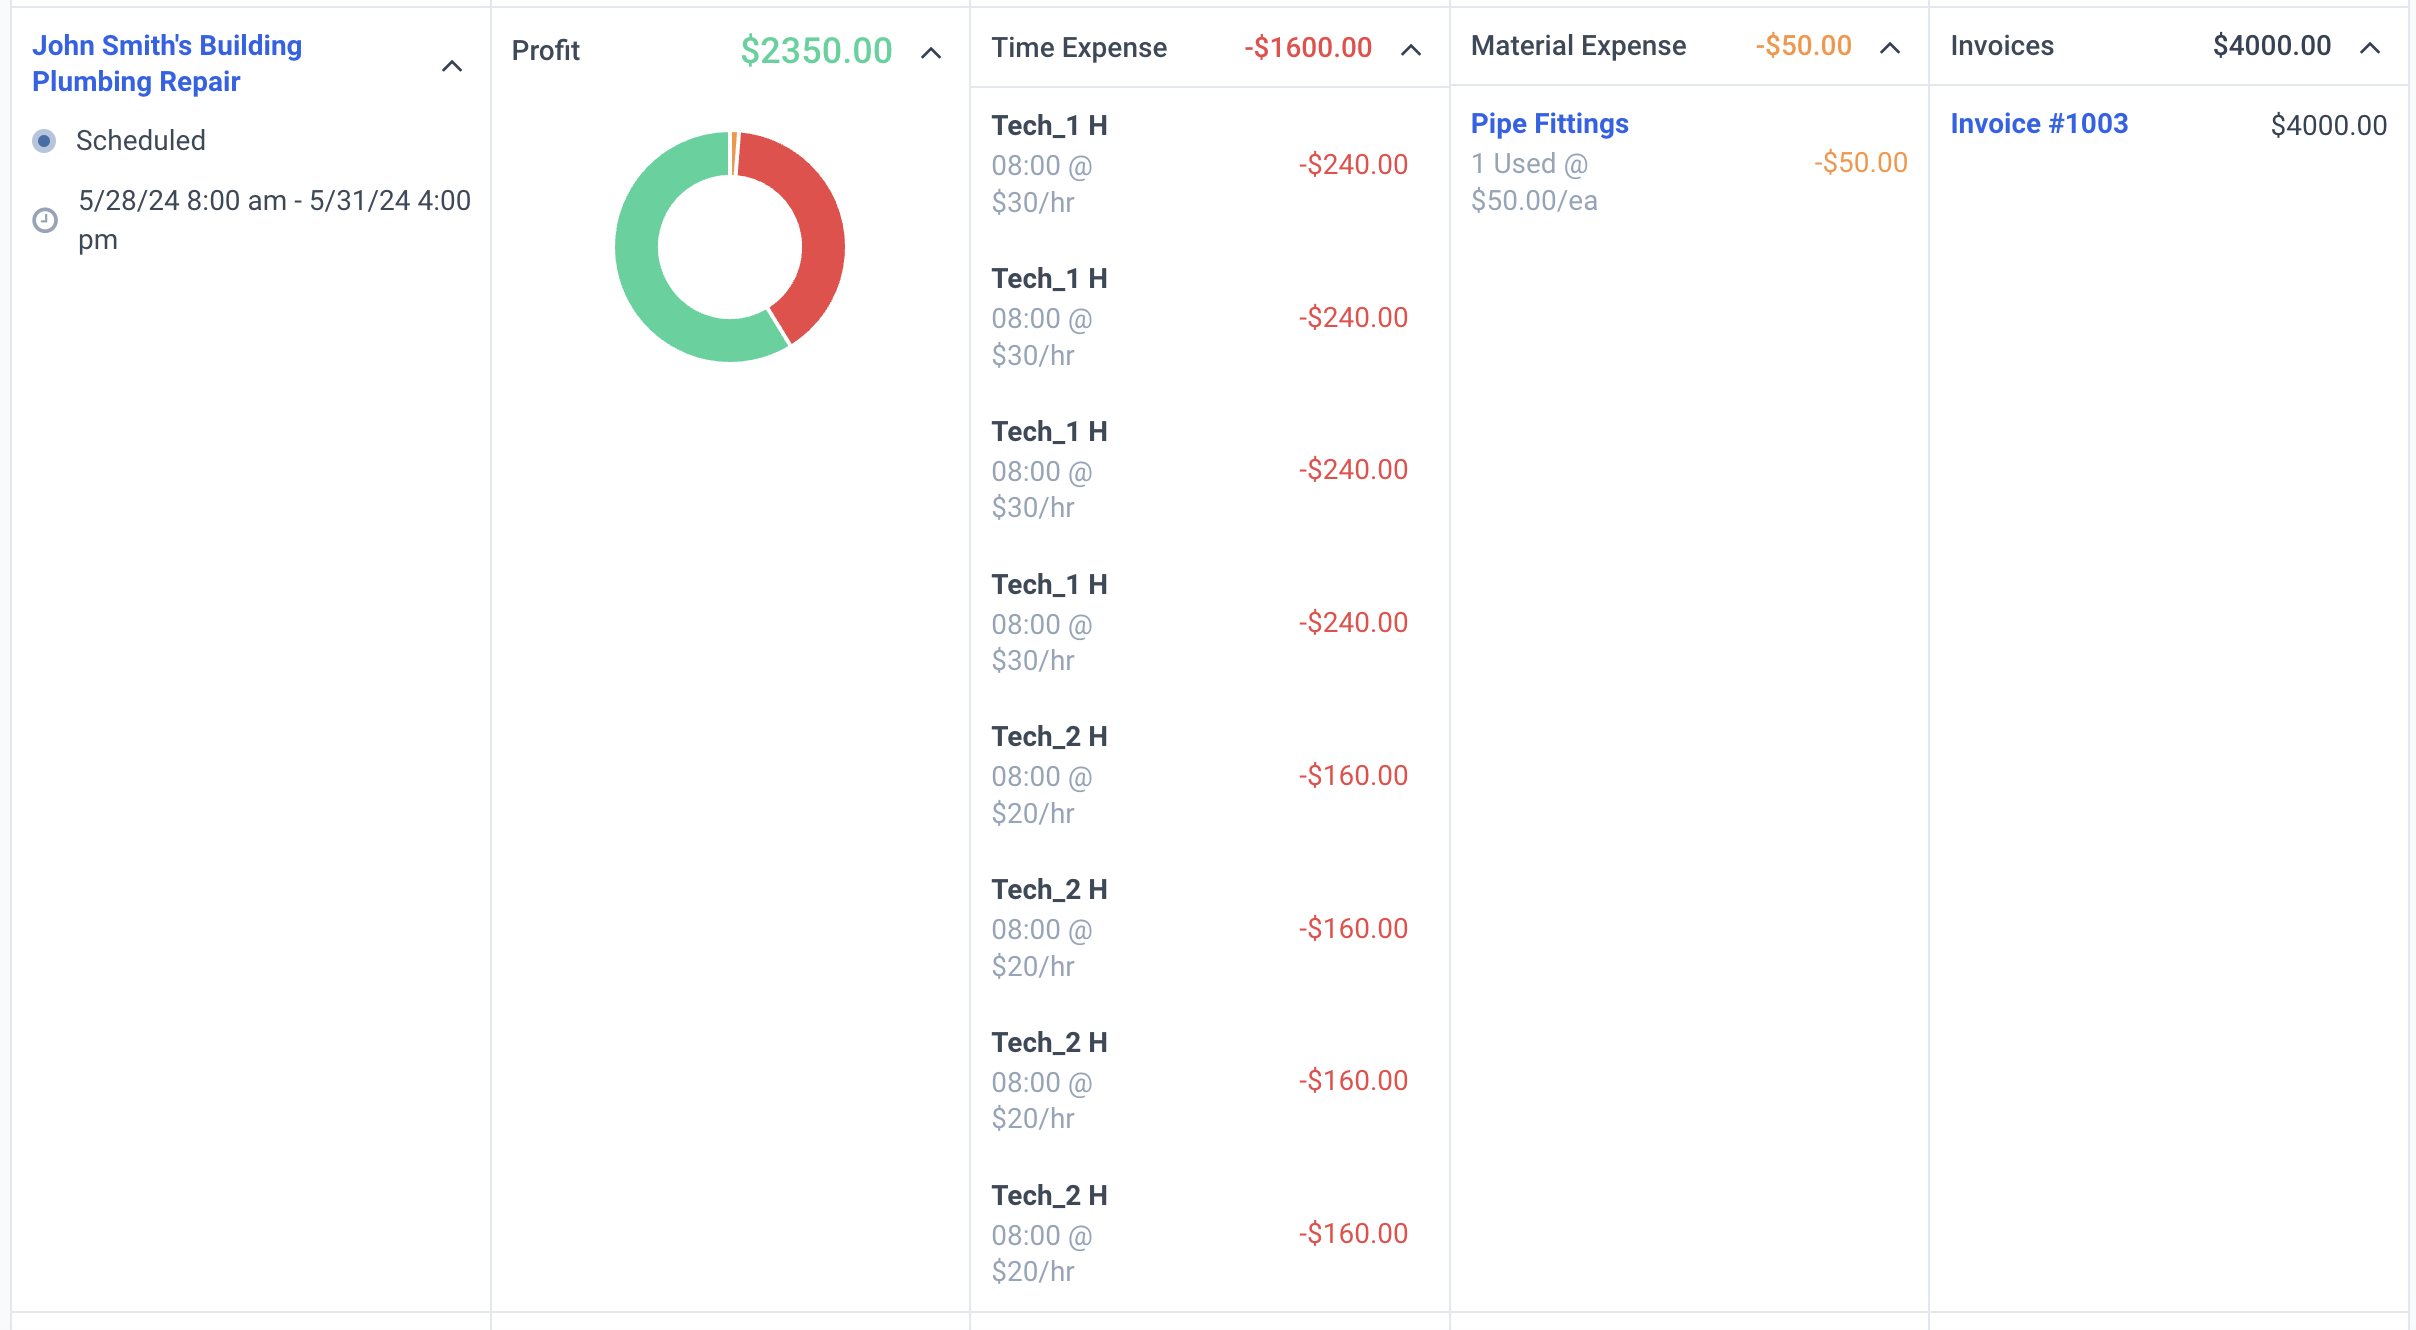
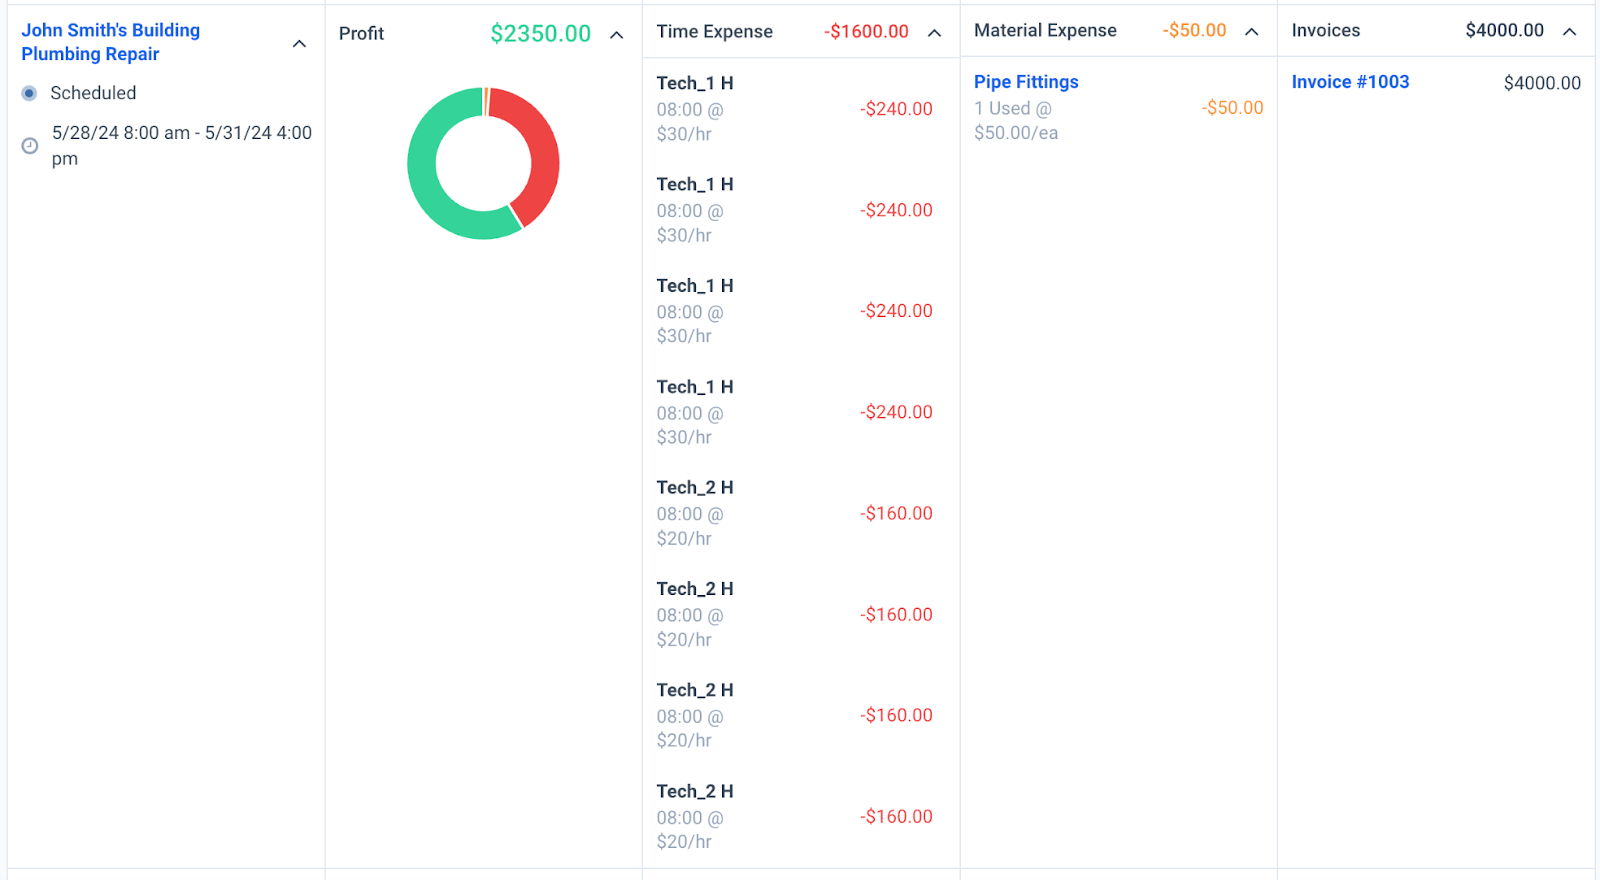
Finally, let’s take a look at the Reports section, where we can get an overview of the job’s profit/costs. The details for “John Smith’s Building Plumbing Repair” are as follows, including a breakdown of the time expense, based on the Hourly Rate (Cost) we entered at the beginning:
- Invoice Amount: +$4000
- Material Expense: -$50
- Time Expense: -$1600 (Tech_1 H: 4 days, 8 hrs/day at $30/hr = $960, Tech_2 H: 4 days, 8 hrs/day at $20/hr = $640)
Overall profit for the John Smith’s Building Plumbing Repair is +$2350.00!
And that’s it!
Thanks for reading this post on understanding job profit and cost with FieldBin Field Service Management. If you are interested in learning more, you can sign up for a FREE trial or Contact Us to get a personalized demo.
P.S Need help growing your business? FieldBin’s Field Service Marketing is available to all FieldBin customers at a discounted rate. We only accept a select number of clients at any given time, allowing us to provide the highest quality of work. If you’re interested, you can read more about it and schedule a time to speak with us here.